Monday, September 26, 2011

DIY manicure - water marble!

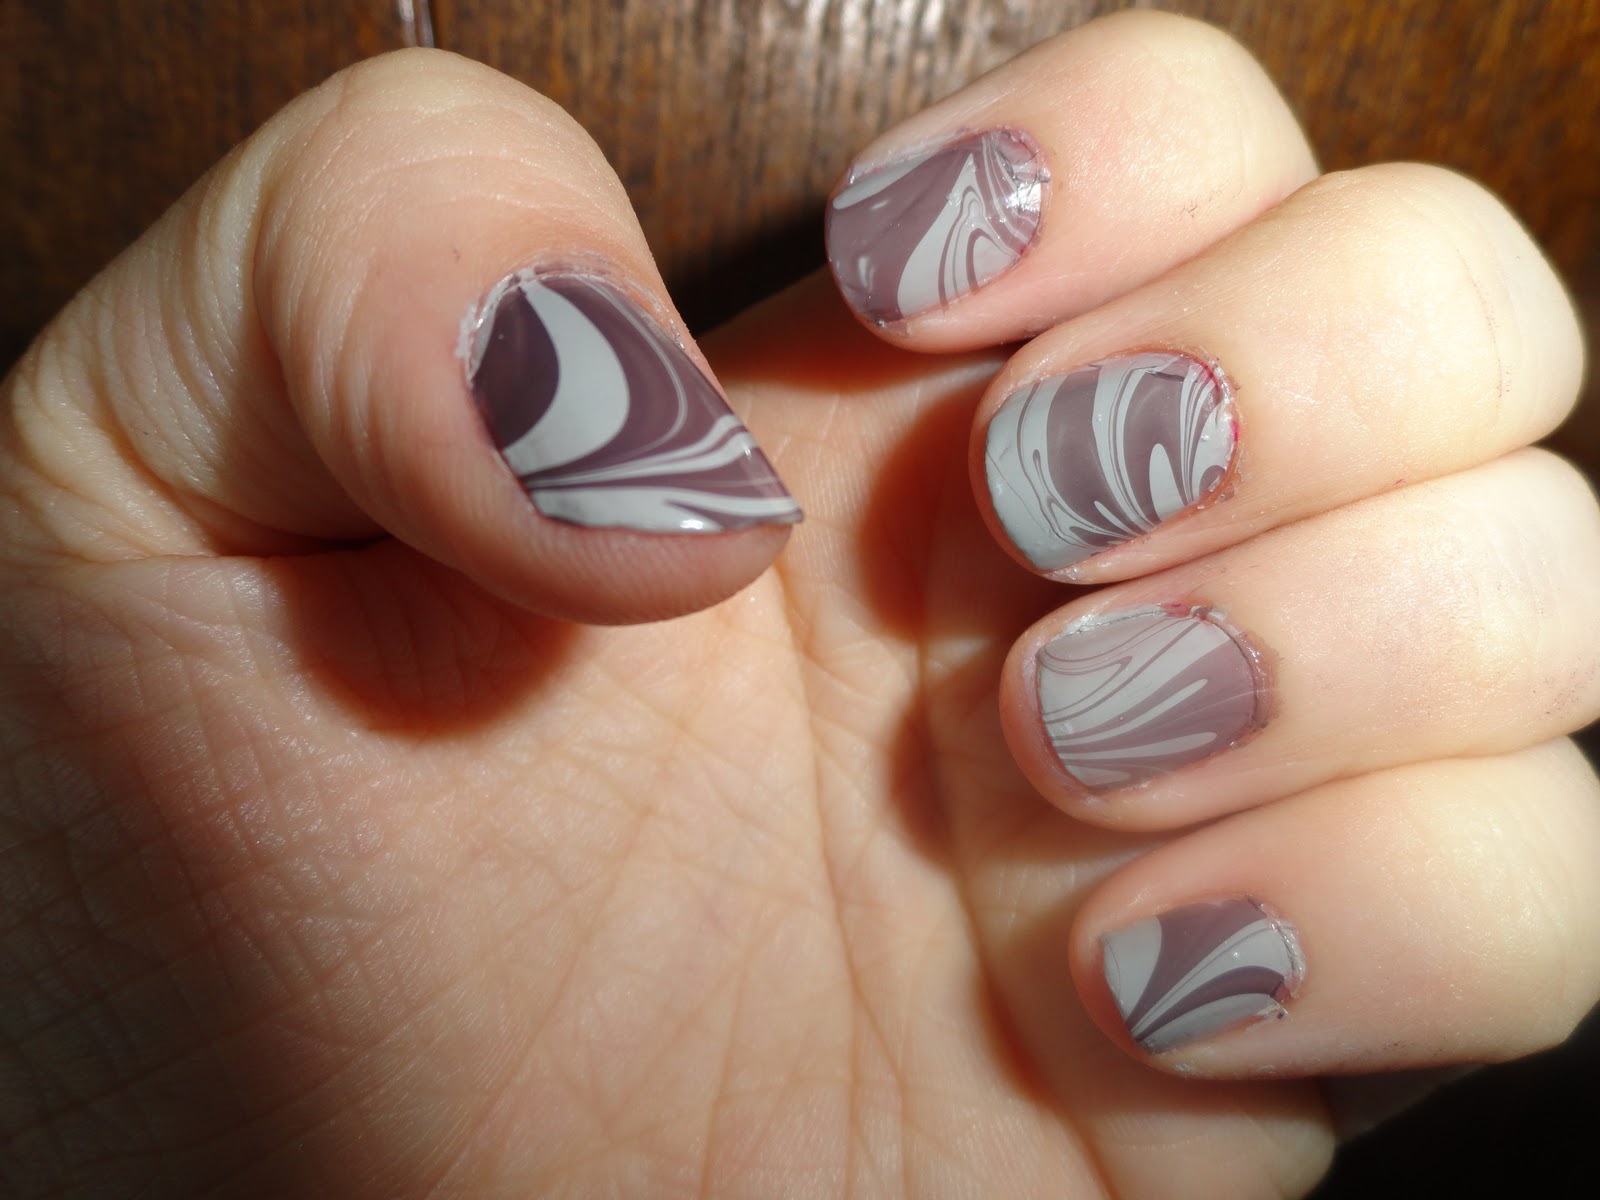
Hey everyone! A few days ago while I was browsing my Twitter (you can follow me @trishamarkrep) I saw a Cosmo tweet about official NFL nail polish, and of course I clicked the link to check out the official nail polish for the MN Vikings! They mentioned the idea of water marbling the 2 shades together, and the picture they showed was so pretty and intriguing that I just had to learn the technique! It took me a couple tries, but I got results that I'm super happy with, and I wanted to share! I used all mark. products for this look, and you can pick the products up at my eBoutique: http://tmassmann.mymarkstore.com Use promo code WELCOME for free shipping on your first order of any size!


My finished nails!


Supplies:
-2 contrasting nail polish shades (I used mark. Nailed It Trend Mini Lacquers in Steel Plum & Industrial)
-mark. The Big Fix 15-in-1 Benefits Balm
-toothpicks
-paper towels
-shallow dish or bowl of room temperature water
-nail polish remover, Q-tips, & cotton balls for cleaning your fingers up


Instructions:


Prep your nails by painting on a base coat. I used Industrial, the grey shade.


Use The Big Fix to coat your fingers. Make sure to cover your cuticles and the front & back of your fingers, down to your second knuckle. This helps so that you can wipe the extra nail polish right off your fingers after you dip them. (I've also seen tutorials using clear tape, but that looked a little more time consuming to me). I did just one hand at a time so I could use my other hand for the rest of the steps.

Loosen the covers on both shades of nail polish. Holding the brush about an inch above the surface of the water, let a drop of nail polish fall into the water. I started with the plum shade so that I could see it more easily. If you're doing it correctly, the nail polish should skim across the surface of the water, thinning out and expanding like you see above. If the drop of polish just sinks to the bottom, you might have to hold the brush closer to the surface of the water.

Working quickly, let a drop of the 2nd shade of nail polish fall in the center of the first. It should expand out also. Keep adding drops of alternating colors, making sure to go quickly. If the drop doesn't expand, the outside shade of nail polish might have dried too quickly. I'll explain further down how to clean it up and start over if you need to.

You'll end up with a rough bulls-eye design of nail polish rings. The exact number of rings doesn't matter much, you just want a fairly small inner circle.

 Take a toothpick, and starting near the outside, drag the tip of the toothpick toward the middle. If you've ever made a marble cake, it's the same principle. You don't want to start at the very outside edge, because that layer of polish will be too dry and will just cling to the toothpick and pull the whole bulls-eye apart. Usually starting with the 3rd ring of color will work, but if you feel or see it pulling on the toothpick, you'll need to start in a little further.

This was my finished design, and it was big enough that I wanted to dip a few fingers instead of just one. I wasn't able to take a picture of my own hand dipped, but when I did my sisters nails later, I made sure to get a picture:

You can sort of choose the section of the design you like best, by lining your finger nail up with that part of the design. Dip your finger(s) in through the nail polish and try to keep it as still as possible. Make sure your finger is deep enough that your first knuckle is under water. (You can also see in this picture an example of when the 2nd shade doesn't expand - you can see the outline of the purple that I started with, and a tiny dot of grey in the center. I just let another drop of purple fall and tried again)

This picture shows how to get the extra polish out of the water. You do this both when your finger is still dipped to clear away any extra polish so that your finger doesn't drag it up, or when you need to start over if the polish dries too quickly for the next color to expand. Start with the toothpick near the outer edge and swirl it around, twisting as you go, to collect the extra polish.

Didn't get a picture of this next part, but when you take your fingers out of the water, I like to sort of curl my fingers up and out, so that the tip of my finger nail comes out of the water first. That helps keep any leftover polish on your finger instead of gunking up your finger nail.

My fingers after dipping 4 at once. I let it dry just slightly (30 seconds or so) before starting to wipe away the polish on my fingers. Using The Big Fix before dipping your nails makes it easy to wipe most of it away with a paper towel, and then after my nails were fully dry, I used a Q-tip dipped in nail polish remover to clean up closer to my nail. I was happy with the design on my pinky and middle finger, but re-did my ring and index fingers. Make sure to do another base coat and reapply The Big Fix before starting over, and let the base coat dry. (We learned this the hard way when I was trying to go get my sister's nails done at midnight, haha!)

My finished nails, left hand!

And right hand. I think my middle finger on this hand is my favorite!


I had a lot of fun with this technique and have gotten tons of compliments on the results! The one thing I'll make sure to do next time is apply a clear top coat to help the manicure last longer. I hope you enjoyed reading, and I'd love to see pictures if you water marble your own nails! Feel free to comment with questions if there's anything I didn't explain well enough :)

Saturday, September 3, 2011

Fall faves!

I think I might be alone in this, but I'm actually ready for summer to be over. I'm ready for cooler weather, the end of thunderstorms, trips to the apple orchard, Halloween, and the start of the holiday season! Of course, the changing season means new mark. faves for me, since my last faves post was from summer! You'll see a few repeats from the Top Ten List I did in May, so you know those are always amazing products in my book!

First up are 7 of my favorite fashion items!

m.powerment Linked To My Heart Bracelet, $30
I've been wearing & loving the whole m.powerment collection of jewelry & lipgloss, but the Linked To My Heart Bracelet is my current favorite! It's so pretty and eye-catching, and as a mom, I love that it jingles when I move my wrist, because I've had to use it to distract my super-busy 18 month old a few times! The best thing about this bracelet, and the other items in the m.powerment collection, is that 100% of the net proceeds ($21.63 from this bracelet!) are donated directly to m.powerment by mark., a philanthropic initiative dedicated to breaking the cycle of dating abuse and partner violence by awarding grants to organizations which share this mission. Through the sale of items like this bracelet, more than $750,000 has been raised and awarded for education and prevention programs in the communities all over the country! 


Color Cluster Ring, $16
mark. has introduced a few new rings since May, but the Color Cluster Ring is still my undisputed favorite! I love the vintage-glam look, and it always gets compliments. I tend to loose interest in some of my fashion & jewelry pieces once the new items come along, but this ring will always keep me coming back!


Scene Stealer Necklace, $36
Ashley Greene, mark's brand ambassador, shared a picture of herself wearing this necklace several months ago, and I've been (im)patiently waiting to get my hands on one! It is such a statement piece, really amping up everything from a casual tee to a much dressier outfit, and I adore the mixed metals feel! This past weekend at a mark. event, we learned a 2nd way to wear the necklace - unhook the clasp, untwist the strands, and pull out the bigger black beaded strand to slip over your head, almost doubling the length of the necklace! I love the added versatility!


Very Vintage Dress, $38
One of my favorite parts of being a mark. rep is the community of other reps you get to know both online and at in person meet ups. We share photos in a mark. rep facebook group, and seeing other mark. reps in this dress convinced me that I needed it too! It looks gorgeous on everyone whether it's a size small or size xxl. The belt comes with, but I have also worn it with the black Touch Of Lace scarf as a sash. This is definitely a piece that can be dressed up or down, and it was just featured in Redbook with a white button-down dress shirt underneath, perfectly taking it from summer flawlessly into the cooler months!


High Stepping Boots, $70
Aaaah, the boots! Back in May, at the National Sales Meeting in NYC, we saw these gorgeous boots as a little teaser in the most recent mark. sizzle reel, and the room exploded with excitement! The boots are another super-versatile item from mark, since you can wear them cuffed under the knee (as shown) or flipped up for extra length! They have a hidden platform for extra comfort, and partial side zippers. I have really small feet (I can get away with shopping in the girls section and comfortably wear a size 4) so I was a little worried the boots would be too big, but they're definitely wearable. I think I might add some insoles to make them fit a little tighter, but I absolutely LOVE them nonetheless.


Get A Handle On It Bag, $60
My new everyday purse, I wasn't crazy about it just in pictures, but then saw my mentor & another rep with theirs at a mark. meet up and fell in love! It's a very soft, pebbled faux leather, and mine is more of a faded black than the picture. The spiky tassels are shiny and add such a rocker feel, so the bag draws attention to itself! I love the outside pockets, perfect for my keys, cell phone, and sunglasses, and there are inside pockets too! I love the roominess, makes it easy to have my stuff with plenty of room left over for diapers, wipes, and snacks for my boys!


Petite Slither Cosmetic Bag, $8
I was so sad at first to see the pink cosmetic bags being replaced, but after getting this new petite bag, I totally understand! The new bags (the mid & super bags are also being updated, to a metallic purple, and a shiny, textured gold) are such a high quality, and the petite bag feels so soft! The inside of the bag is still a somewhat slippery material, so they should still wipe clean, just with a much nicer outside quality than the older plastic-y cosmetic bags! Customers will be able to purchase the new bags starting on Friday, September 9 through my eBoutique at http://tmassmann.mymarkstore.com


 Now, what do I keep in my make up bags?! Here are 7 of my favorite beauty items!
 Please Hold Eye Primer, $8
This is the 2nd product that I mentioned in May as well, and for good reason - I use it every day! This eye primer makes my eyeshadow more vibrant, and last longer without creasing. It can also be used as a concealer.


Super Flip Color Kit, $20 (or $10 with any $20 purchase!)
It's the updated, fall version of mark's unique Super Flip kit, and this one contains 9 super pigmented eyeshadows on one side, and then flips over to a full-sized face illuminator. The eyeshadows provide buildable color, so you can still have just a soft wash of color if that's what you prefer. I'm loving the bottom middle color, Greenery. Like the new cosmetic bags, the Super Flip will be available to customers on September 9.


i-mark Metallics, $6 each
I can't even begin to express how much I love the new metallic i-marks! They're formulated with shea butter, giving them a luxurious feel, and are highly pigmented for gorgeous, buildable color! I love purple shadow to make my hazel eyes pop, so clearly Jazzy is my new favorite shade!


What A Line Felt Tip Eyeliner, $9
I had never been a fan of liquid eyeliner, until this one! It feels like you're using a marker, making application super easy! It comes in 4 shades, Wee Hours is my current favorite, but next on my list is Brownie Points!


Lash All You Want, $10
I am SO thrilled with this new mascara! It makes my lashes look longer, thicker, and just generally more defined! Black is of course my go-to shade, but I also love putting the Violet shade just on the tips to add dimension and just a little pop of color! The brush is incredible, with little bristles at the tip so I can get the tiniest lashes!


Lipclick SPF 15 Color Shine Lipstick, $10
Part 1 of my new favorite lip look is SPF 15 Lipclick in the shade Glama! This is the lipstick for someone not used to wearing lipstick - a sheer wash of color and shine, with the added bonus of sun protection! Plus, like mark's original lipclick, the case is magnetic and clicks closed!


Glow Baby Glow Hook Up Lip Gloss, $6
Part 2 of my favorite lip look is Glow Baby Glow in shade Girly Girl! It's a gorgeous hot pink, that combined with Glama gives me the perfect pink lip, with a little bit of shine! Plus it connects to any of mark's other hook up products, giving you more than 7500 possible combinations! My favorite combo is Girly Girl along with A Spray We Go hook up perfume in Jewel, which has been discontinued, but you can sometimes catch it in our Last Chance section!


There you have it, my can't-live-without-em fall faves from mark! Want to purchase any of the products I mentioned? Head to my eBoutique at http://tmassmann.mymarkstore.com and use promo code WELCOME for free shipping on your first order!


Want to earn some fabulous mark. goodies for free? Consider hosting a mark. party! I'm always looking for more party hostesses (in the SW Minnesota area) who want to have a great time with their friends while seeing the latest and greatest products from mark! Find me on facebook, or contact me through my eBoutique for more information!
Tuesday, July 26, 2011

best. cupcake. ever.

Yesterday, I discovered a new favorite cupcake recipe, and that's saying a LOT considering I didn't think anything could ever beat my love for my grandma's Red Velvet recipe! I wanted to try a cupcake dipped in ganache, so I googled and found the perfect recipe to try! You can find the recipe here:

This was my first time taking photos of the steps as I was mixing & baking, and I missed a few, but you'll get the general idea!

 All the dry ingredients!


 Dry ingredients mixed together. 
(my 3 year old's favorite part - he says "It's my job, mom!")


 LOVE my KitchenAid stand mixer! It was a hand-me-down from my mother in law when she got a new one. How did I bake without this before?!


Cream the butter & sugar until light & fluffy!

 The finished batter!

I am totally loving my new scoop! Perfectly portioned, even cupcakes!

 The recipe called for chocolate chips sprinkled on top of the batter before baking! This is the first time I've made cupcakes with chocolate chips on top, I totally expected them to just melt in!

 I was surprised to see the chocolate chips still whole when I took the cupcakes out of the oven! They are a yummy surprise under the frosting! Also, a great tip I read somewhere: run a toothpick around the outside of every cupcake right after taking them out of the oven! This prevents any overfilled batter from sticking to your pan & ruining your cupcakes when you try to take them out!


 The to-die-for mint buttercream frosting! I'm out of piping bags, so I just filled a ziploc & cut one of the corners off, since I was just doing simple swirls. I've seen a team on Cupcake Wars who can make gorgeous swirled frosting using only a spatula! I thought it was a little rude when they were scoffing at the other teams using piping bags, but it's definitely a skill I wouldn't mind learning, haha!


 The chocolate ganache! It took about 45 seconds in my microwave, you want the cream warm to the touch & the chocolate just barely starting to melt, so that the chocolate is not cooked! The whisk was the perfect choice to help mix & finish melting the chocolate!


Dipping the cupcakes in the ganache was probably my favorite part! I double dipped them, letting the ganache dry just a bit in between. I had quite a bit of ganache left, so I dipped some graham crackers too, which my boys have been loving!

 I sprinkled Andes mint baking chips on the wet ganache, and then let the ganache firm up a little more in the refrigerator. I think it's so cute how the mint buttercream peeks out from underneath the ganache! I'm also loving my display tower that I got on clearance at Walmart, only $4!


 Some of my new mark. products in front of the cupcake display, to use as the picture for my "sugar sugar" cupcake+mark. party event! Local followers, check out the details on facebook!

Without the flash. 

There you have it, my new favorite cupcakes! I'll still be making the Red Velvet for our birthday parties, since it's a tradition I want to keep, but these cupcakes will be my guilty pleasure from now on, haha! 

Do you have a favorite cupcake recipe? I'd love to try it out! Next up on my list is finding a delicious cupcake with less dairy ingredients, for a friend who tries to be dairy-free as much as possible!

Thanks for reading!

Sunday, July 24, 2011

cupcakes + mark = perfection!

Remember the new i-mark metallics I showed you last post? There's a shade called sugar sugar, and that inspired my decision to change my blog name, to reflect my new direction for the blog - a combination of my love for mark. and my love for cupcakes - baking them & eating them haha! I hope you'll like the change and variation in posts!

My mark. mentor, Erica, has monthly meet ups in Eagan MN for reps & anyone interested in becoming a rep! Our team is called Erica's Rockstars, and it's such an incredible group of successful, helpful women! I look forward to the meetings every month, and last month was extra amazing because my bff (and fellow mark. rep!) Lindsey & I stopped at a bakery I've been dying to check out before heading to Caribou for the meet up!

I'm addicted to all things cupcake - baking them, searching new recipes, Cupcake Wars, DC Cupcakes, etc! I was so excited to see a Minnesota team on Cupcake Wars, and just happened to be watching that episode with Lindsey a few days before the monthly meet up! We decided on the spot that we needed to make a stop for cupcakes before the meeting, since neither of us get out without kids often, so a trip to the Cities (2 1/2 hours one way!!) needs to be packed with fun!

The shop we stopped at is simply called Cupcake, but their cute logo has a coffee cup for the U, since they also serve soups, sandwiches, coffee, etc! You can check out the website (and their yummy variety of cupcake flavors) here: 

Of course I brought my camera with to document our trip! We had quite the adventure getting there, and leaving especially, due to construction in downtown Minneapolis, but it was totally worth it! Here are a few pictures of the building, entrance, etc!

 Part of the indoor seating area, where you can see in to the kitchen!


 Check out the adorable whisk door handles!


The patio, where we enjoyed our cupcakes! It was such a nice day, warm with a gentle breeze! Perfect weather for eating outside!

Now on to the best part - THE CUPCAKES!

 The cupcake display case! SO many choices, I couldn't pick just one! I saw a cupcake called "Buddha Belly" which I didn't recognize from the website, and when I asked about it, the girl described it as a spiced chocolate cake, topped with chocolate mousse, dipped in spiced chocolate ganache. I exclaimed "OOH, is that from Cupcake Wars?!" She reacted with much less enthusiasm - a bored nod and sarcastic "Yes." Huh. Guess she gets that question a lot. Oh well!


 I settled on these 4 cupcakes (clockwise from top left): Razz-ma-tazz, Chocolate Peanut Butter, Mint Chocolate Chip, and Red Velvet!


 Also had to get a Mini Red Velvet to eat there! The cake was good, but I must not be a fan of cream cheese, because I hated the frosting! All in all, I think my own Red Velvet Cupcakes, with the recipe given to me by my grandma, are much better!


 I decided to eat one of my other cupcakes there too, and chose the Razz-ma-tazz! Ohmygosh, I LOVED it! Chocolate cake with a raspberry filling, raspberry buttercream frosting, and chocolate shavings! I tried to replicate this at home with less-than-stellar results. I'll have to keep trying!


 I took the other cupcakes out of the box for better pictures of them! Here's the Mint Chocolate Chip, which I had half of before bed that night! Chocolate cake with mint buttercream frosting, topped with chocolate chips! I liked this one a lot, but it was a little too heavy on the frosting for me!


 Chocolate Peanut Butter, which I enjoyed for breakfast the next day! Chocolate cake with peanut butter buttercream frosting, topped with a chocolate peanut butter candy! Very good, but again, a little too much frosting for me. (I know, I'm weird. Most people like the frosting best!) I've baked a similar cupcake for the hubby since, and it was pretty yummy! My only disappointment was that I was out of icing bags, and using ziploc bags was not working! I guess it's time to invest in a professional decorating kit!


The full-sized Red Velvet, with cream cheese spikes! Funny side-story for this one - my sister's 2nd baby boy was born the morning of this trip, and I brought this cupcake to the hospital for her. The cream cheese had started to wilt, and one spike had fallen down over the side. Cassie asked if it was supposed to be a dragon, but I found out later that her husband thought it was breastfeeding cupcake, I'll let you guess what he thought the spikes resembled. Oh my! Haha!

I didn't get pictures of Lindsey's cupcakes, but she got the Paris Hilton to eat there (vanilla cupcake with sweet frosting, covered in hot pink sprinkles!) and it turned her fingertips hot pink! She also got a 2nd cupcake to take home, the Caramel Chai Lotus, which was another cupcake featured on Cupcake Wars. She didn't care for the frosting, but said the cake was good!

I think we'll have to make Cupcake a traditional stop on the way to the mark meet-ups! If anyone would like to join us, feel free to comment or send me a message! Lindsey was just coming along for fun the first meet up she attended, and by the next one she had decided to sign up as a rep! :)

I'm hosting a cupcake-tasting/mark. party on August 5th & 6th! Guests can offer insights on my cupcake recipes, check out the latest beauty & fashion from mark. and get more info on the mark. opportunity! For more info or to RSVP, find me or my mark. fan page on facebook! (click the tabs at the top of my blog page for links!)

Thanks for reading!